
DIY Egg-Carton Walking Caterpillar: Articulated Joints & Segment Mechanics
Transform a Household Egg Carton into an Undulating Multi-Segment Creature with Directional Kinetic Gliders
- Puncturing holes through tough egg carton domes should always be done by an adult or under direct supervision using a dull tool.
- Bottle caps are small objects: keep them safely stored and out of reach of toddlers under 3 years old.
- Use child-safe blunt-nose scissors and non-toxic water-based paints.
Everything You Need to Build This Toy
- 1 clean cardboard 12-egg carton (molded pulp)
- 4 to 6 plastic bottle caps (uniform beverage caps)
- Scrap cardstock or cardboard from empty food boxes
- Cotton baker’s twine or scrap yarn (approx. 40-50 cm)
- 2 chenille pipe cleaners (antennae)
- Washable non-toxic tempera paints or acrylic markers
- 2 craft googly eyes (or hand-drawn paper circles)
- PVA craft glue, tacky glue, or double-sided glue dots
- Blunt-tipped child-safe safety scissors
- Single-hole punch, dull pencil, or small nail/awl (used by adult)
- Paintbrushes and water jar
- Ruler or measuring tape
Assembly Instructions (5 Steps)
Follow each step carefully. Work together to clean waste, score precise cuts, align pivots, and test kinetic mechanics.
Dissect & Trim Egg Carton Segment Pods
Cut the lid and flap off the egg carton. Carefully cut apart 5 or 6 individual egg cups, trimming down the jagged flanged edges until each cup sits flat when placed open-side down on a table.
Cuts along the factory divider grooves to separate the individual egg cups and trims the perimeter smooth.
Trimming removes excess flange material so the cups can pivot freely against one another without binding or catching.
A neat lineup of 5 or 6 identical dome-shaped pulp cups with smooth, level base rims.
Cutting too close to the cup dome, causing the side walls to rip. Leave 2-3 mm of base rim for structural strength.

Perforate Pivot Channels & Thread Flexible Yarn Spine
Using a dull pencil or hole punch with adult supervision, pierce two aligned holes near the top apex of each egg cup (one in the front, one in the back). Thread the twine through the first cup, tie an internal knot stop, and string through each successive cup, tying a spacer knot every 2 cm.
Assists in threading the stiffened yarn through front-to-back holes and testing the slack between cups.
Spacer knots create mechanical stops. If the cups are tied flush together, the toy becomes a stiff stick; 2 cm of slack gives each segment the freedom to pivot and arch.
A connected chain of cups that flexes smoothly like a reptile spine when lifted.
Pulling the knots too tightly against each cup wall, eliminating joint movement.

Affix Bottle-Cap Cam Runners & Gliders
Turn each egg-cup segment upside down. Apply generous craft glue or tacky dots to the top rim of 4 to 6 clean plastic bottle caps, and press them firmly under the left and right edges of the cups to act as gliding foot pads.
Arranges matching bottle caps and presses them under the base rims of the egg cups.
Cardboard edges generate high friction on floors; smooth polypropylene caps minimize drag and provide a stable sled base.
Each segment now stands elevated on colorful bottle-cap feet that glide effortlessly across smooth tables.
Mounting bottle caps at uneven angles, causing the caterpillar to tilt or drag unevenly.

Sculpt Antennae, Face & Painted Patterns
Paint each segment with bright green, yellow, or striped colors. On the front head cup, poke two small holes to twist in pipe cleaner antennae, glue on googly eyes, and draw a happy insect smile with markers.
Paints vibrant patterns on the caterpillar segments, coils pipe cleaners around pencils, and designs the expressive facial features.
Personalized art builds creative ownership and tactile sensory engagement with recycled materials.
A charismatic, colorful insect character with curled antennae and bright playful eyes.
Saturating cardboard pulp with too much wet paint, which softens the structural fibers.

Rig Pull Control Lead & Calibrate Walking Gait
Tie the front protruding string to a cardboard washer, bead, or bread-tag handle approx. 25 cm from the head. Place the caterpillar on a smooth floor or table, and give short, rhythmic horizontal tugs to observe the segmented inchworm crawl.
Pulls the control lead across different floor surfaces at varying speeds to discover the ideal crawling rhythm.
Iterative testing teaches children to adjust angle and force to achieve smooth kinetic harmony.
The caterpillar gracefully ripples across the floor, segments arching and relaxing in a realistic invertebrate gait.
Pulling upwards at a steep angle, which flips the head backward instead of drawing it forward.

Biomechanics of Articulated Locomotion & Peristalsis
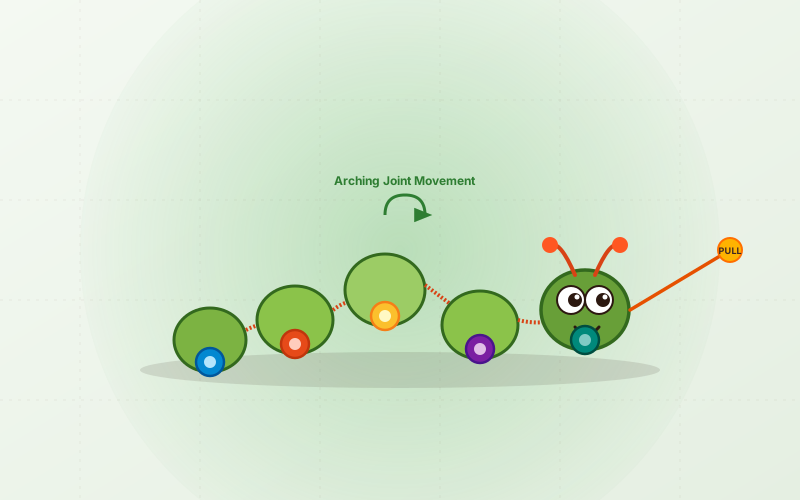
Real caterpillars and inchworms propel themselves through peristaltic locomotion: sequential contractions of segmented body muscles that transmit a traveling wave from tail to head. In this DIY mechanical model, each egg-cup segment functions as a rigid skeletal pod connected by a flexible string linkage. Because the string knots leave slack between cups, each segment possesses angular degrees of freedom (pitch and yaw). Smooth plastic bottle caps mounted underneath act as low-friction directional sled runners: when you pull the forward lead cord in rhythmic tugs, tension pulls the front segment forward while rear segments slide and compress in an arching inchworm crawl.
Flexible joints allow rigid segments to transfer kinetic force in waves, while directional surface friction converts simple linear pulling into realistic insect locomotion.
Skills Your Child Develops with This Project
Kinetic Mechanics & Sequencing
Visualizing how individual disconnected parts interact through tensile cord joints to produce coordinated group movement.
Fine-Motor Precision & Puncturing
Threading flexible yarn through narrow perforations and mastering knot spacing to regulate joint flexibility.
Circular Economy Mindset
Experiencing firsthand how fragile, throwaway food packaging transforms into durable mechanical storytelling toys.
Fun Family Experiments & Mini-Games
The Incline Crawl Challenge
Prop a cardboard box flap at a 15-degree slope. Test whether your caterpillar can crawl uphill without slipping backward.
Rhythmic Inchworm Relay
Try short rhythmic pulses vs. long steady pulls. Time how long it takes your caterpillar to cross a 2-meter floor course with the most lifelike motion.
Change One Variable & Observe What Happens
True scientists don’t just follow instructions—they test hypotheses! Try these guided experiments to see how altering physical variables changes your toy’s behavior.
Surface Friction Face-Off
Test the caterpillar across three different surfaces: a smooth wooden table, a rough cotton bath towel, and a tiled kitchen floor. On which surface does it walk with the biggest arch?
Floor texture / Coefficient of friction
Expected Observation:Smooth surfaces allow effortless sliding, while moderate texture (like a tablecloth) catches the rear feet slightly, producing higher, dramatic inchworm arches.
Segment Weight Redistribution
Tape a metal coin (penny or washer) inside the tail segment, and test the pull. Next move the coin to the middle segment. How does changing the weight distribution affect the gait?
Position of ballast weight along the segmented spine
Expected Observation:Adding weight to the rear segment anchors it more firmly, forcing the middle segments to buckle upward into a taller arch before the rear catches up.
Joint Spacing Calibration
Untie one knot and reduce the slack between two cups to 0.5 cm, while leaving 3 cm between others. Does the caterpillar bend evenly?
Length of cord between mechanical segment joints
Expected Observation:Tight segments stay rigid and turn as a single block, proving that joint freedom dictates flexibility.
3 Discussion Questions for Parents & Teachers
How do the loose string knots between each egg cup help the caterpillar bend like a real insect instead of staying stiff like a ruler?
Why do you think real caterpillars have soft, segmented bodies rather than hard shell bones like a beetle?
What happened to the sliding motion when you pulled the toy on a smooth floor versus a fluffy carpet?
Troubleshooting & Quick Fixes
The pull string is attached too high or is being pulled upward at a steep angle.
Thread the pull string through the lowest part of the head cup and keep your hand level with the floor during pulling.
String knots are tied too tightly against the cardboard, preventing pivot angles.
Loosen and re-tie the knots so there is at least 2 cm of loose twine visible between adjacent cups.
Glue did not bond securely to the slick, non-porous polypropylene plastic of the cap.
Lightly rub the top rim of the cap with sandpaper or an emery board and use tacky PVA or hot glue (adult help).
Make It Your Own: Safe Design & Decorative Ideas
Why Reusing This Waste Matters
Egg cartons are made from short, recycled paper fibers that can only be re-pulped a limited number of times before degrading. Plastic bottle caps are among the top ocean litter items because they often slip through municipal sorting screens.
By transforming both paper cartons and bottle caps into kinetic toys, families divert single-use items from landfills and give discarded packaging a playful second life.
Parent Note:
This classic upcycled project introduces children to robotics concepts like articulation, degrees of freedom, and mechanical linkages using gentle household supplies.
DIY egg carton caterpillar
/toys/trash-eco-toys/egg-carton-walking-caterpillar
Beginner+ • 4-8 Years
35 Minutes
Make a DIY walking caterpillar from recycled egg cartons and bottle caps! Teach kids articulated joints, directional friction, and kinetic motion with ToyToBook.
AI Photography & Diagram Prompts (Hero, Materials, Step-by-Step)▼
Bright child-friendly DIY craft photo of a colorful articulated walking caterpillar toy made visibly from a recycled cardboard egg carton and colorful plastic bottle-cap feet. It has pipe-cleaner antennae and googly eyes, resting on a clean wooden table with natural studio lighting, no text, realistic homemade aesthetic.
Knolling flat-lay arrangement of clean recycled supplies: one 12-cup molded pulp egg carton, six colorful plastic bottle caps, a roll of baker twine, child safety scissors, washable green paint tubes, and pipe cleaners neatly laid out on a light craft surface.
Clear educational DIY tutorial photograph showing hands carefully threading a cotton string through pre-punched holes in two green-painted egg-cup segments with visible knot stops between them, step-by-step maker demonstration.
More Upcycled Projects in Cardboard & Box Engineering & Beyond
How to Build a Mechanical Cardboard Automata
Learn mechanical engineering by building an oscillating kinetic sculpture from corrugated cardboard, barbecue skewers, and offset cams.
DIY Multi-Tier Cardboard Marble Run & Gravity Spiral
Engineer a multi-tier gravity run using toilet paper rolls, shipping boxes, and paper cup funnels to explore friction, slopes, and momentum.
How to Build an Upcycled Cardboard Pinball Machine
Construct a desktop arcade pinball game using a cereal or shoe box lid, rubber-band spring flippers, popsicle stick bumpers, and marble deflectors.