
Cardboard Tube Periscope: Optical Reflection & Dual 45° Mirrors
Engineer a Secret Corner-Viewing Device from Paper Towel Rolls and Child-Safe Shatterproof Mirrors
- NEVER use real broken glass mirrors. Always use child-safe reflective acrylic sheets, safety mirrors, or heavy Mylar foil cardstock.
- Adult supervision is required when cutting narrow slots with utility blades or craft knives.
- Never point the periscope directly into the sun, as concentrated solar rays can damage eyesight.
Everything You Need to Build This Toy
- 2 sturdy cardboard paper towel tubes or 1 long cardboard shipping tube
- Scrap cardboard from delivery boxes (mirror backplates)
- 2 child-safe shatterproof acrylic mirror sheets or high-gloss mirrored cardstock (approx. 5x7 cm each)
- Black construction paper (internal light-baffling liner)
- Black electrical tape or dark masking tape
- Glue stick or double-sided tape
- Ruler with centimeter markings
- Protractor or 45-degree triangle template
- Pencil and eraser
- Child-safe scissors
- Craft knife (adult assistance required)
Assembly Instructions (5 Steps)
Follow each step carefully. Work together to clean waste, score precise cuts, align pivots, and test kinetic mechanics.
Cut Viewing Windows at Opposite Tube Ends
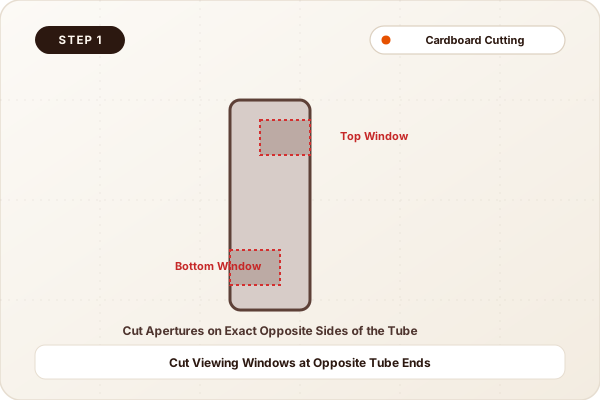
Join two paper towel tubes end-to-end with tape to create one long 50 cm cylinder (or use a mailing tube). On the front side of the tube 3 cm from the top, cut a rectangular viewing aperture (approx. 4 cm wide by 3 cm tall). On the exact opposite back side 3 cm from the bottom, cut an identical aperture.
Measures 3 cm from tube ends, traces the rectangular window outlines, and cuts out the cardboard port flaps.
Sight apertures establish the entry and exit ports for the light beam.
A long cardboard cylinder with one window at the top facing front and one window at the bottom facing rear.
Cutting both windows on the same side, which causes the viewer to look back at their own forehead instead of forward.
Score 45-Degree Angular Slits Behind Apertures
On the side of the tube directly across from each viewing window, use a protractor or 45-degree triangle template to draw a line slanted at exactly 45 degrees to the tube length. Have an adult carefully cut a narrow slit along these lines just wide enough to fit your mirrors.
Aligns the 45-degree protractor mark along the tube wall and traces the diagonal guide line with a pencil.
If the angle deviates even by 5 degrees (e.g. 40° or 50°), light will bounce into the tube wall rather than reaching the bottom mirror.
Clean diagonal slits cut into the side walls directly behind the viewing windows.
Freehanding the angle without a protractor or template, resulting in misaligned reflections.

Fabricate Child-Safe Mylar Reflective Mirrors
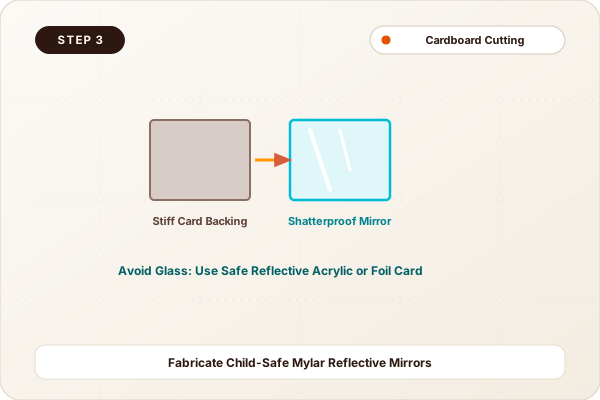
Cut two rectangles of child-safe reflective acrylic or mirrored cardstock to match the internal diameter of the tube (approx. 5 cm by 7 cm). Glue them onto stiff scrap cardboard backings to ensure they stay perfectly flat and will not bow under tension.
Traces mirror templates onto reflective cardstock and backs them with stiff cardboard flaps.
A curved or warped mirror creates a funhouse effect; a stiff backing keeps the reflective plane flat for sharp imagery.
Two rigid, scratch-free reflective mirror plates ready to slide into the tube slots.
Touching the shiny reflective surface with oily fingers, leaving smudges that blur the optical view.
Slide Mirrors into Slots & Calibrate Parallelism
Slide the first mirror into the top 45-degree slot with the reflective face pointing down toward the bottom of the tube. Slide the second mirror into the bottom slot with its reflective face pointing up toward the top mirror. Peer through the bottom window to check the view.
Gently inserts the mirrors into the slots and peers through the eyepiece while an adult holds the tube.
Real-time optical feedback lets you micro-adjust the tilt of the mirrors until the horizon line appears perfectly level.
A bright, crisp image of the room appears inside the bottom eyepiece, looking over obstacles.
Inserting a mirror backward so the cardboard backing faces inward, blocking all light.

Tape Light Seams & Conduct Covert Field Trials
Once the mirrors are aligned, securely tape all exterior seams with black electrical tape or duct tape to lock the mirror plates in place and prevent ambient light leaks. Take your periscope on a field mission behind couches and over table edges!
Wraps sealing tape around the mirror joints and tests peering over tabletops and around door corners.
Blocking light leakage prevents glare inside the tube, giving high-contrast clarity to the reflected scene.
A sleek, durable spy periscope that allows you to observe objects 50 cm above your eye level while staying hidden.
Using thin transparent tape that lets outside room light shine through the seams.

Geometric Optics, Specular Reflection & Ray Paths
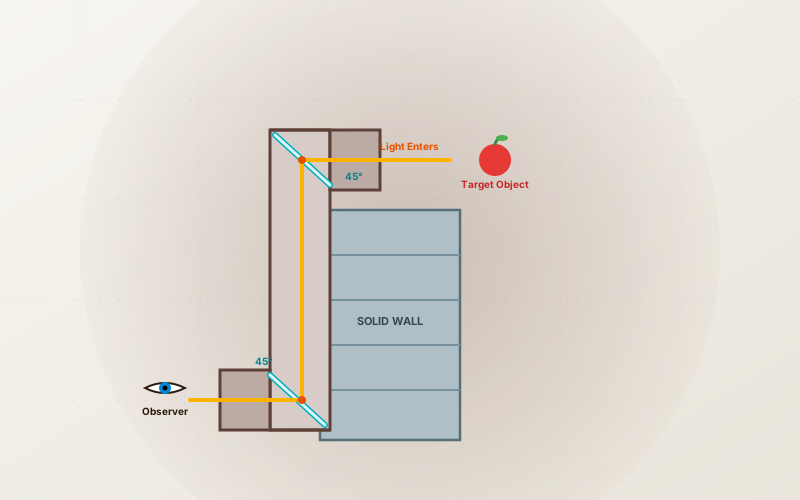
Periscopes work through specular reflection governed by the Law of Reflection: the angle of incidence equals the angle of reflection (θi = θr). Photons travel from a light source, bounce off an external object, and enter the top viewing port horizontally (0°). By placing the top mirror tilted at exactly 45 degrees, incoming horizontal light hits the mirror at a 45-degree angle of incidence and reflects at 45 degrees, bending the light beam exactly 90 degrees straight down the vertical tube. At the bottom of the tube, an identical second mirror tilted parallel at 45 degrees intercepts the downward beam and reflects it another 90 degrees outward toward the observer’s eye. Because the beam undergoes two successive 90-degree turns in the same plane, the resulting image remains completely upright and true to orientation.
Two parallel 45-degree mirrors bend light rays through two successive 90-degree turns, allowing an observer to see over walls without inverting the image.
Skills Your Child Develops with This Project
Geometric Precision & Angle Measurement
Using protractors or drafting triangles to lay out exact 45-degree cuts and understanding angular symmetry.
Optical Ray Tracing & Spatial Cognition
Mentally mapping how invisible light beams bounce off planar reflective surfaces to reach the human eye.
Iterative Calibration & Alignment
Tuning mirror angles to eliminate optical distortions, double images, or tunnel clipping.
Fun Family Experiments & Mini-Games
The Secret Agent Corner Peep
Crouch behind a closed door or high tabletop. Use only the periscope to identify a secret object placed by a partner without exposing your head.
Optical Angle Distortion Hunt
Tilt the top mirror slightly backward with your finger. What happens to the ceiling and floor in your view? Can you tilt it to see behind yourself?
Change One Variable & Observe What Happens
True scientists don’t just follow instructions—they test hypotheses! Try these guided experiments to see how altering physical variables changes your toy’s behavior.
Non-Parallel Mirror Deviation Test
Gently tilt the top mirror to 30 degrees while keeping the bottom mirror at 45 degrees. What happens to the reflected image?
Mirror tilt angle / Deviation from parallelism
Expected Observation:When mirrors are not parallel, the light beam strikes the interior tube wall instead of the bottom mirror, darkening or completely clipping the field of view.
Anti-Glare Interior Lining Comparison
Compare viewing through an unlined brown cardboard tube vs. one lined with matte black construction paper. How does image contrast change?
Internal surface absorption / Matte black baffling
Expected Observation:Black paper absorbs scattered off-axis rays, preventing internal light bounce and creating a significantly crisper, richer image.
Periscope Height & Field of View
Join three paper towel rolls together to create a 75 cm super-tall periscope. How does the size of the viewing window circle (field of view) change?
Focal distance / Tube length
Expected Observation:As the tube gets longer, the field of view narrows (tunnel vision effect), requiring more precise angular alignment.
3 Discussion Questions for Parents & Teachers
Why do the two mirrors need to be tilted at exactly 45 degrees instead of lying flat at 90 degrees or straight up at 0 degrees?
Can you trace the path a ray of light takes from an apple across the room all the way into your pupil?
Why does the scene in the periscope look right-side up instead of upside down like in some magnifying glasses?
Troubleshooting & Quick Fixes
The mirrors are misaligned, pointing the wrong direction, or inserted at the wrong angle.
Shine a flashlight into the top port. Adjust the mirrors until a bright spot of light shines directly out through the bottom port.
Ambient light is leaking through the slit cuts, or fingerprints are smudging the reflective mirror surface.
Wipe the mirrors with a soft microfiber cloth and cover all cut seams with opaque black electrical tape.
One mirror slot was cut slightly slanted across the horizontal axis.
Gently shim one edge of the mirror with a folded piece of cardstock until the horizon levels out.
Make It Your Own: Safe Design & Decorative Ideas
Why Reusing This Waste Matters
Heavy kraft paper cores are manufactured from dense unbleached wood pulp. Instead of recycling them after a single use, reusing them in structural projects keeps virgin fiber out of the waste stream.
Building a working optical tool from household tubes proves that sophisticated scientific instruments can be built sustainably without purchasing commercial plastic kits.
Parent Note:
An engaging optical physics craft that turns cardboard rolls into an interactive submarine instrument, teaching geometry, specular reflection, and light paths.
DIY cardboard periscope
/toys/trash-eco-toys/cardboard-tube-periscope
Intermediate • 7-12 Years
40 Minutes
Build a working spy periscope from recycled cardboard tubes and safe mirrors! Learn the law of reflection and geometric optics with ToyToBook.
AI Photography & Diagram Prompts (Hero, Materials, Step-by-Step)▼
Engaging child-friendly DIY craft photograph of a cardboard tube periscope peering over the edge of a stack of colorful books. A child’s hand holds the decorated kraft-paper tube, and the reflective mirror inside the viewing window shows a clear reflection of a red toy car. Clean background, soft natural lighting, no text.
Neat flat-lay arrangement of craft supplies on a craft cutting mat: two cardboard paper towel tubes, two square child-safe acrylic mirrors, a protractor, black electrical tape, scissors, a pencil, and black construction paper.
Clear educational step-by-step photograph showing a pencil and protractor marking a precise 45-degree diagonal line across the side wall of a cardboard tube, ready for the mirror slot cut.
More Upcycled Projects in Cardboard & Box Engineering & Beyond
How to Build a Mechanical Cardboard Automata
Learn mechanical engineering by building an oscillating kinetic sculpture from corrugated cardboard, barbecue skewers, and offset cams.
DIY Multi-Tier Cardboard Marble Run & Gravity Spiral
Engineer a multi-tier gravity run using toilet paper rolls, shipping boxes, and paper cup funnels to explore friction, slopes, and momentum.
How to Build an Upcycled Cardboard Pinball Machine
Construct a desktop arcade pinball game using a cereal or shoe box lid, rubber-band spring flippers, popsicle stick bumpers, and marble deflectors.